Tag Archive: Technique


Shot Breakdown : Bhuna Bhutta

Food photography is becoming very popular thanks to mobile phones. Even the rise in keeping fit has pushed people to shoot food & showcase it online. Today I’ll show you how I shot, bhuna bhutta(Roasted Corn). Roasted Corn is a must have during monsoons. It can be had at roadside in India. Its healthy as well as tasty at the same time. The masala & lemon squeezed make it absolutely mouth-watering.

Bhuna Bhutta

Continue reading

Its a human tendency to lust on luxurious things. Photographers are no different species. Their wish-list is often filled with high end camera bodies & further high end fast glass. If you happen to go through it, you’ll find most of lenses having a fast aperture of f/2.8, 1.8, 1.4 or even 1.2.

The thing is, they believe owning these fast lenses will make their job easier. They will be able to shoot in lower light, get more creamier backgrounds & come close to making photographs like their role model photographer. However, there is also another aspect to this thinking. No doubt, one will get benefit of shooting at lower ISO’s with these fast lenses or getting creamier backgrounds. But has anyone given a thought to the shallows DOF’s provided by these fast lenses?

The shallow DOF commands the photographer to be very perfect in his shooting technique. Since the DOF is very shallow(and get even shallower at telephoto ranges), a photographer must be adept at his focusing technique. A small lapse in focusing and the picture will go straight into the Trash Bin. Here amateur photographers are better off with consumer grade lenses which offer medium apertures & conceal any mistake of the photographers when it comes to focusing. Also not to forget professional lenses like 70-200mm f/2.8 weigh a lot & if you’re not build like a tank, you’re going to get fatigued which will ultimately result in shaken pictures. In worst cases, you may prefer to keep such lenses at home & shoot with your normal consumer lenses which defeat your original purpose of getting a fast lens.

So as you see, its not that simple. Before you go out to buy those fast professional lenses, take a quick look at your capability. Ask yourself – How accurately you focus? How often you need to shoot Wide open? Do you really need the f/1.4 or a f/2.8 or f/4 lens will suffice? Its a case of, “With Great Power comes even Greater Responsibility”. Its better to hone your basic camera skills with your consumer lenses for a year or two before you take the path of getting fast professional lenses. This does not only applies to lenses but to any high-end photography gear. Any high-end photography gear might make your job simpler but will also magnify any of your shortcomings. So first measure your photographic capability before splurging.

Shooting in Windy Conditions

Shooting in windy conditions is a challenging task. Yesterday, I was shooting at the coast & the wind was furious. In-spite of a tripod, I had to take some actions in order to prevent blur in my pictures.

# Secure Tripod – You’ve a tripod so you think it would be stable enough in ferocious wind. It might be but you need a decent tripod. Most entry level tripods won’t stay put in strong wind. Make sure you’ve setup the tripod properly. The legs are extended properly and the legs are pulled out properly & secured tightly. Make sure the tripod legs lay firmly over the ground. You may need to clear small pebbles or other things which may not give adequate friction to the legs. Most of the tripods come with a hook which enable you to put on some weight. It is exactly made for such windy situations. Places some rocks & sand in a bag & tie it to this hook. Alternately, you can even put any bag you might be carrying like I do. Finally, avoid raising the center column of the tripod. On extending, the center column without much support is prone to vibrate from strong wind currents. You may not be able to see it vibrate but you’ll see the outcome in the resulting photo.

# Remove the Lens Hood – Yes, remove the lens hood. If the wind is blowing across you from a side, then you must remove the hood. This is because the wind will hit the floral extended part of the hood & cause it to vibrate. The aerodynamics take a hit & due to this the camera will begin to shake. Remove the lens hood & keep it aside so you won’t face this issue.

# Use Self-Timer/Remote Release – If you’re shooting landscapes, put up self timer on your camera of 2 or 5 secs. Alternately use a cable release/wireless remote release. Off-course this will not apply when you’re shooting portraits.

# Block the Wind – This is a no brainer. Try to block the wind by standing in the direction of it hitting the tripod. This small tip can tremendously increase the stability of the tripod. If you’ve large reflectors with you, open it up & ask someone to hold it for you or you can do the same.

Photographing wildlife needs the photographer to approach the subject stealthily. One needs immense patience & good presence of mind to get good photographs of wildlife. Often the birds, animals don’t entertain humans & at times they may even get on defense & counter-attack. Happened to me once. I was in a balcony shooting a small bird perched on a nearby power line. To get closer, I went into the balcony, crouched & just held my hand up. As I fired a shot, another shot the bird got furious & decided to attack the camera however it missed. As I got up to go inside, it again flew furiously just across my face. A split second delay in my reaction would have got me injured near or on my eye. Thankfully I was safe. So the point of telling you this short tale is that one needs to approach the wildlife in a way that it is unaware of you. When you are successful in doing so, you will get good shots as the wildlife won’t be scared or put on a defensive mode.

Continue reading

Shot Breakdown : Food is Ready!

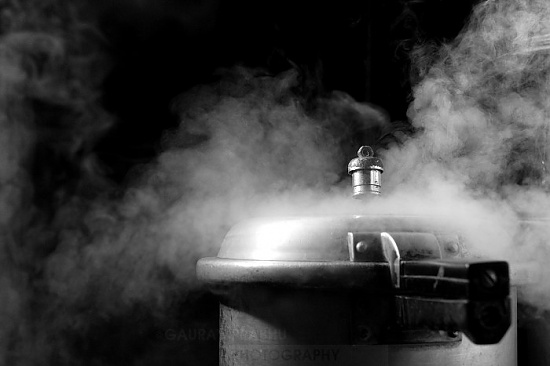
Ever since I undertook the 365 Project, shooting unique shots everyday has become an impulse. I don’t spend hours into thinking the shot to be made each day, but it comes to me naturally(touch wood). If you’ve been following my project, you would be knowing about the shot titled “Food is Ready”. Today, I’ll show you exactly how it was achieved.

EXIF Info:

Shutter Speed : 1/250th

Aperture : f/7.1

ISO : 200

Focal Length : 50mm

Camera & Lens : Canon EOS 60D with Tamron 17-50mm f/2.8 XR Di II LD SP Aspherical

Flash : Vivitar 285HV at Half Power(triggered via wireless flash trigger)


Looking at the shot, you might be fooled into believing its a two light setup but its not. The shot was done using a single speedlite. I used a Vivitar 285HV manual flash. For the shot setup, its nothing but my kitchen platform on which my stove rests. I cleared up utensils lying around the stove so I could setup my tripod & on it the wireless flash receiver(with flash off-course). The flash was covered by a newspaper so the light could not spill in background or cause a glare on the lens and illuminate the pressure cooker sharply from the left side. On the right side of the pressure cooker is a wall which acted as my reflector in this photograph. I sat around two feet away with my camera ready & with the composition I wanted. Just as the whistle of the pressure cooker blew, I took the shot. The first shot had less steam, so I took another a while later & that was the one you’re seeing here.

As for post-processing, its minimal. Just RAW processing in Bibble Labs Pro followed by a greyscale conversion, contrast curve & a slight cropping in GIMP. My desired shot was ready. So before getting another flash, know how much one can do just with a single flash. This is just a simple example.